The Digispark in my previous post introduced me to the Arduino family, but with only 8kB of memory it was never likely to have the capacity to process both GPS and sonar data and write it to an SD card. Arduino is not a technology I had played with before starting this project but turns out it is really easy to set up and get going. The 'Blink' sketch is the Arduino equivalent of the ubiquitous 'Hello World' of every programming language ever invented - one of many, many examples that come with the freely downloadable IDE.
En route to the Pantomime on Christmas Eve, we detoured via Maplin picked up an Arduino/Genuino Micro. This comes with a heady 32kB rather than the 8KB of the Digispark.
 |
| Adruino Micro, HC-SR04, USB GPS & SD card |
It turns out Python blocks when it reads/writes to/from a serial port so I had to lean about Python threading. Then I had to learn about how you can Ctrl-C from a Python thread so I didn't have to keep manually killing the process! (As an aside, I also learnt enough Python to control my half price Maplin 433MHz remote sockets from my Pi. I'm easily entertained...)
There are a huge number of libraries for Arduino, so the chances are, if you want to do something, someone has probably done it already (and than made a library out of it). NewPing was the first library I 'discovered', when I setup the Digispark. This library does all the complicated stuff for ultrasonic sensors so I don't have to.
Next up was TinyGps, a small but perfectly formed library for parsing NMEA [pdf] data (this is a standard set of strings or 'sentences' that most GPS devices spit out). The sensor built by Dr Ian Walker used a combined Real Time Clock (RTC) and data logging shield. Microcontrollers (and the Raspberry Pi) do not have a RTC so do not know or store the current date and time. The Pi often gets its time from ntp when it boots up, but this requires a network connection. With a GPS we can get the exact time - down to the nano second!
By default, most GPS devices output location data once per second. It is possible to reconfigure the frequency, but the setup strings are not standardised across devices so I've left this alone for now. We definitely want more frequent readings from the sonar and after a little trial and error, I settled on a 'sonar heartbeat' of five times a second. This should not swamp the SD card and will also give sufficient time to get a median reading from multiple 'pings'.
Meanwhile, an SD card board had arrived, so I gingerly plugged it in. The repeated dire warning in many of the pieces of documentation I'd read about SD cards was: "Don't use 5v, anything more than 3v3 will fry your card.". The board I'd bought was listed as running on 3 or 5v, but I suspect I'd not be the first person who bought something from eBay that wasn't quite as described...
I tested with some old/broken SD cards and when they didn't smoke I put in the one and only spare I had. The example scripts for Arduino are brilliant.
I now had a working prototype, albeit with a laptop attached, so I stood at the side of the road and tested of the rudimentary setup. Thoughts turned to power supplies and charging - this Arduino Micro is 5v, so to power it on the move I would need either a portable USB charger or a LiPo battery + a step-up booster + a charging circuit. More components, more complexity. The USB battery is definitely an option when I revisit the Pi version, but for ease of shareing, the unit really needed to be self-contained. Enter the Adafruit Feather Adalogger.
This featherweight microprocessor had an on board SD card and built-in battery charging. The only downside was it ran at 3.3 volts whilst the cheap HC-SR04 sonars run at 5v. However, it removed the need for several components with just the step up booster required.

I'd also ordered a couple more cheap sonars - I wanted to see how consistent their measuring was, but I couldn't get the two new ones to work. It seems not all HC-SR04s are created equal. Some will trigger with 3v3, others absolutely require 5v. Not happy. This would mean having a logic level shifter (new to me too!) - yet another component.
On the plus side, the Adafruit Feather performed well, despite only running at 8MHz but it was time to bite the bullet and buy a more expensive sonar that ran at 3v3. This is the Maxsonar MB1010, from Maxbotix. They have a huge range of sonars for every application, but my choice was based on price and easy availability in the UK as well as noting Ian Walkers use and comments. The top end fully waterproof models are way out of the target price range for this project, but may appeal to some who want to log data in all weather.
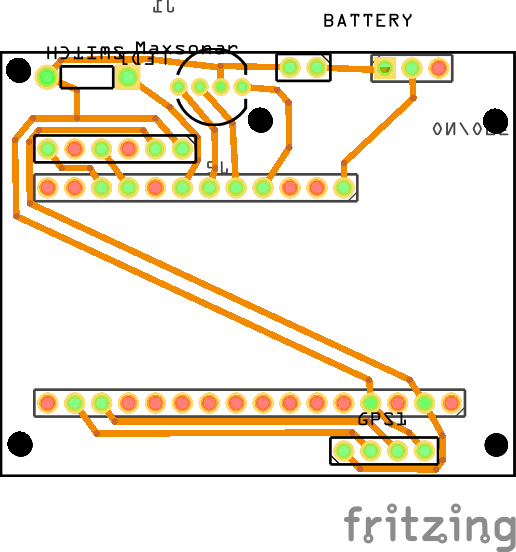 A couple of (late) nights later, with the great Antoine de Saint Exupéry sitting on my shoulder, I had reduced the design to the minimum: a single sided PCB with just three main components. Although this design is operational on a breadboard, this PCB layout is currently untested as my local PCB fabricator wanted to charge me £800 'consultation' fee before looking at it! The next step is to implement this on a peg board, to improve the connection reloability of the prototype, then I'll probably use Fritzing to get a test board made up.
Other than the plethora of new new things I've learnt, one of the biggest personal benefits of this project was that for almost the whole of the Christmas and New Year period I watched very little television but we're back into the swing of work/life, time is a little more limited.
I now have the Arduino code mostly written and a rudimentary Leaflet based web 'viewer' of the data.
 This is a local street on the way back from my local bike shop that is absolutely awful to cycle along. The colour grading of the line shows red for less than 1m and shades from red to yellow to green for 1m to 2m passing distances. The data is only ever held locally (using Javascript FileReader), so privacy is ensured.
The next post will document the device I have prototyped in greater detail, along with the functionality implemented in the Arduino code. I have created a Github repository, but that is another learning curve I need to overcome before I populate it.
Part 3: Breadboard to Pegboard

